Sunday, January 13, 2013

The Build - Crypt of the Everflame

Here is a Flikr photo set with images from the build of the Crypt of the Everflame. I really have no estimate of the time it took to do as I did an hour here, a few here, cast bricks while doing other things, etc. It was a three or more months of calendar time though, but I went weeks without working on it.

I tried to stay as true to the provided map as possible while making alterations necessary for working with the Hirst Arts materials.  For instance you can see the pillars in the map are 5' x 5' while the Hirst Arts pillars are smaller, thus placement was different.  Also, originally I did not know I was going to make sarcophagus lids so I used insets in the walls at first.  All in all I think it ended up being pretty close to the original while utilizing some of the cool things that could be done with Hirst Arts.

This was my first such build.  As stated in an earlier post, I was introduced to this technique during two sessions at PaizoCon 2012 presented by Sean Reynolds. One was using foam for terrain making and the other was on casting castle and dungeon bits using Hirst Arts molds.  I highly recommend the Reynolds sessions as a great introduction to both techniques, and recommend Hirst Arts.  Hirst makes awesome molds that can be used for specific builds, or for making Dwarven Forge type reusable pieces.

Here is a list of some of the materials I used in this build:


Crypt of the Everflame Game Play

When finally had the chance to use my Hirst Arts crypt in game play.  I made some alterations to the encounter to allow us to spend a bit more time with it.  Instead of the written four skellies supporting Asar I have him fifteen.  Some of these were D&D fourth edition-esque "minions".  I did not want to TPK the party, but I did want to extend the number of rounds they were there.  Not all fifteen were exposed at first either, so this lessened the impact.  In addition one skeleton had a trick-shot bow that he used to disarm, trip, etc.  Again, not causing damage, just delaying players.  Another skeleton used an enhanced bashing shield (written into the encounter) to bull rush with.

Asar at first held the hostage as a shield to prevent ranged attacks.  I also gave him a "Push" spell ability to push back immediate threats.  Last, I allowed Asar to raise four corpses (the bandits) as minion style zombies.  When that happened the collapse feature of my crypt archway was triggered, hampering players in the area.

Doing all this took the encounter towards, but not TOO close to a TPK.  We had two members down at one point, and let us play for over two hours.  A good time was had by all.  Other modifications to this encounter included an interesting magic item for each player.  Again, this module was the first RPG experience for a couple of the members, and a early experience for a couple others, so I wanted there to be some good loot as a reward for them.


Check out the Flikr - Photo Set.

Tuesday, January 8, 2013

Back to the Inn

Ever since we had kids my family has not left home on Christmas. We don't travel to the various parents (all local), we make them come to us.  In return we usually do dinner for a couple sets of them. (We have more than our share)

For some reason my wife and I decide that this year our Christmas dinner should be a medieval feast.  I think the thought process was, "let's do game hens ... hey, what about buying tankards and daggers and calling it a medieval feast!"  We're like that. Given the bounty of good fresh and dried fruits, vegetables, meats, drinks and such it was probably more of a fantasy feast that an adventuring party may order up with some of the haul from the latest dungeon delve.

I found some very cheap daggers (what I found were actually $1.75 ... sadly I had to pay shipping on EACH one. Still cheap), a set of wooden plates, and I scored a great eBay purchase on some glass bottomed pewter tankards.  Add piles of food and a carcass each and it was probably the best Christmas dinner since the pagans were converted.

The best part was that we didn't even warn anyone.  When it was time to eat we just sat everyone down ... "Here's your dagger ... throw me a sweet roll!"  I am looking forward to incorporating this into a gaming session.

Creating a Sarcophagus

In an earlier post I showed you Kassen's Tomb that I built using Hirst Arts molds and my knowledge acquired from a brief introduction to terrain building from Sean Reynolds at PaizoCon 2012.  In addition to the Hirst molds, I created my own mold for the sarcophagus lid and a base for the statues.  The Hirst Arts site has links to mold making instructions as well as materials one needs to do this.  I also watched various videos on mold making that mainly taught me the usefulness of legos in this process.  My material list included.

For step by step images check out my Flikr photo set.  Below you can see the process summed up in one shot.


Monday, January 7, 2013

Crypt of the Everflame - Kassen's Tomb

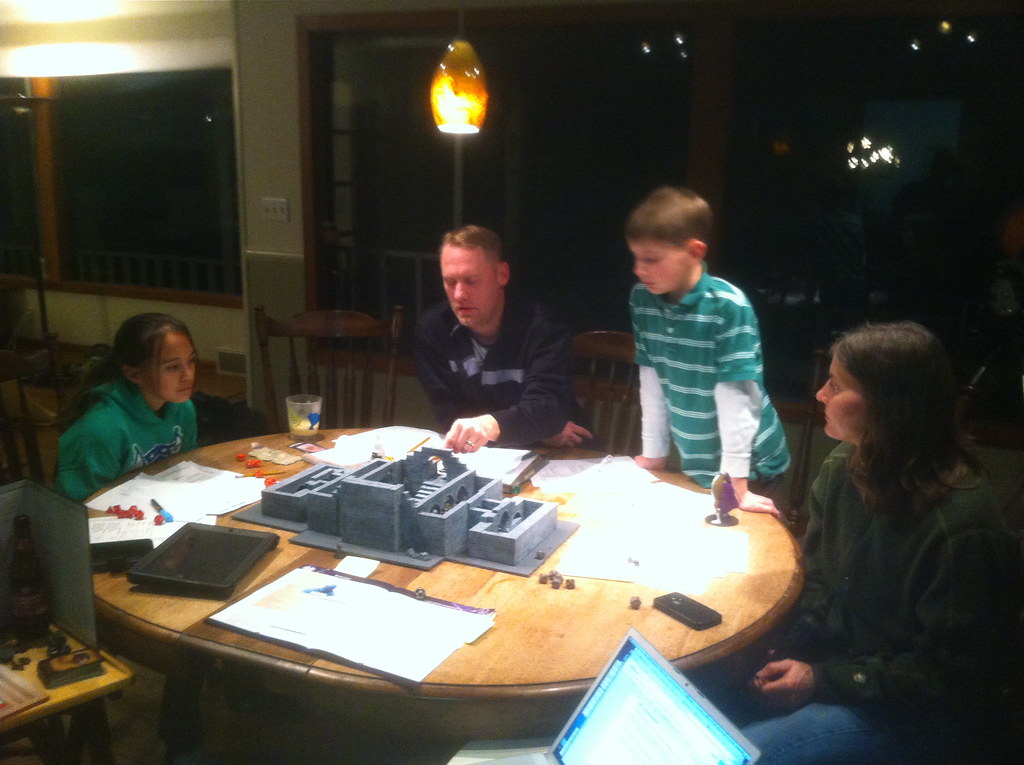
A few months ago I started a campaign to introduce my cousin's kids (I guess I could just say my once-removed cousin's) to D&D ... or actually Pathfinder (We all say D&D. My habit has even trained my children and these children to call all fantasy RPG's D&D ... it's like Kleenex or Xerox ... but more fun.)

I started the campaign shortly after attending PaizoCon 2012.  I had a great time at PaizoCon and have signed up my oldest son (10) and myself for this year's festivities.  In any case I was fortunate enough to "win" lotteries to attend two sessions presented by Sean Reynolds. One was using foam for terrain making and the other was on casting castle and dungeon bits using Hirst Arts molds.  I highly recommend the Reynolds sessions as a great introduction to both techniques, and recommend Hirst Arts.  Hirst makes awesome molds that can be used for specific builds, or for making Dwarven Forge type reusable pieces.

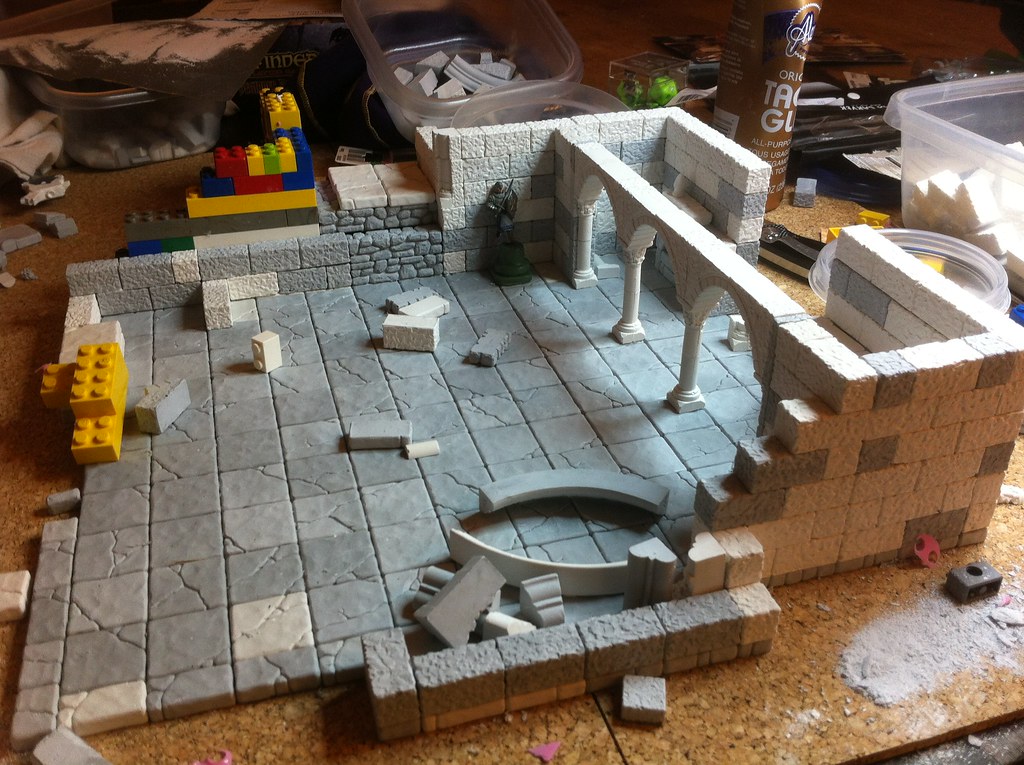
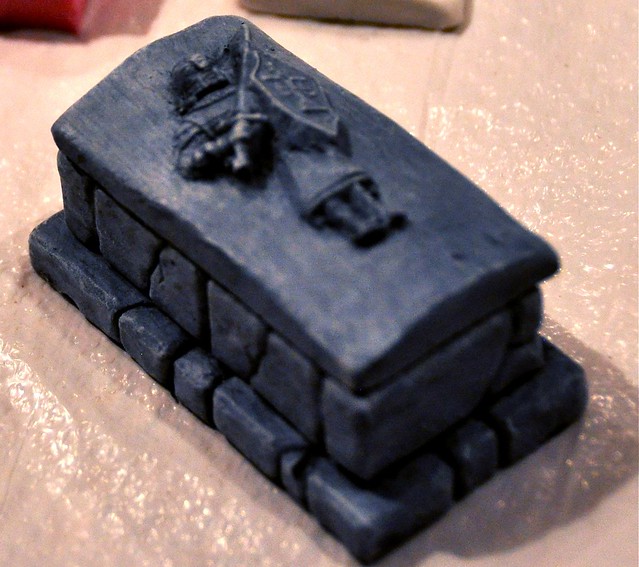
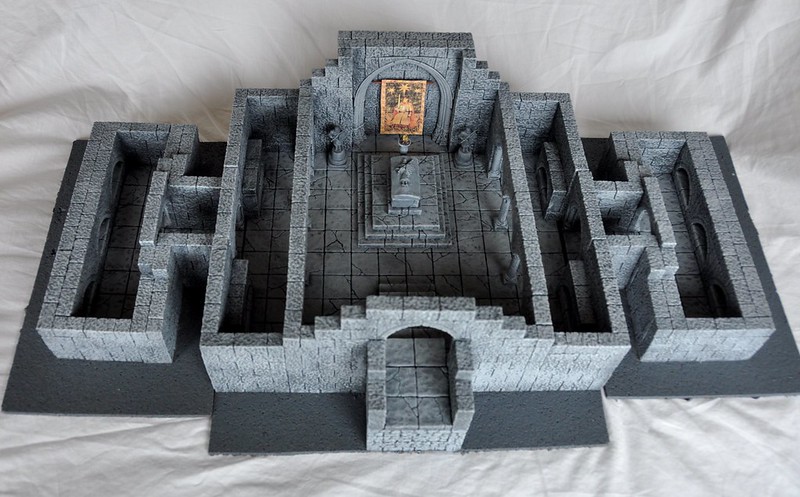
Given my new knowledge, and the fact that I was indoctrinating four new players into the realm of RPGs (7-12 yrs old) as well as my wife, and re-introducing my cousin (we had not played for some 20 years), I thought I would end the Crypt of the Everflame with a bang by making the crypt using Hirst Arts product.  The project turned out great for my first time out.  You can see more pictures of the tomb in this Flikr photo set.

The final encounter was delayed a good month while I finished my first project of this type.  With Mr. Reynold's kick start introduction, and the directions on the Hirst Arts site I was not just able to use the molds, but also to 
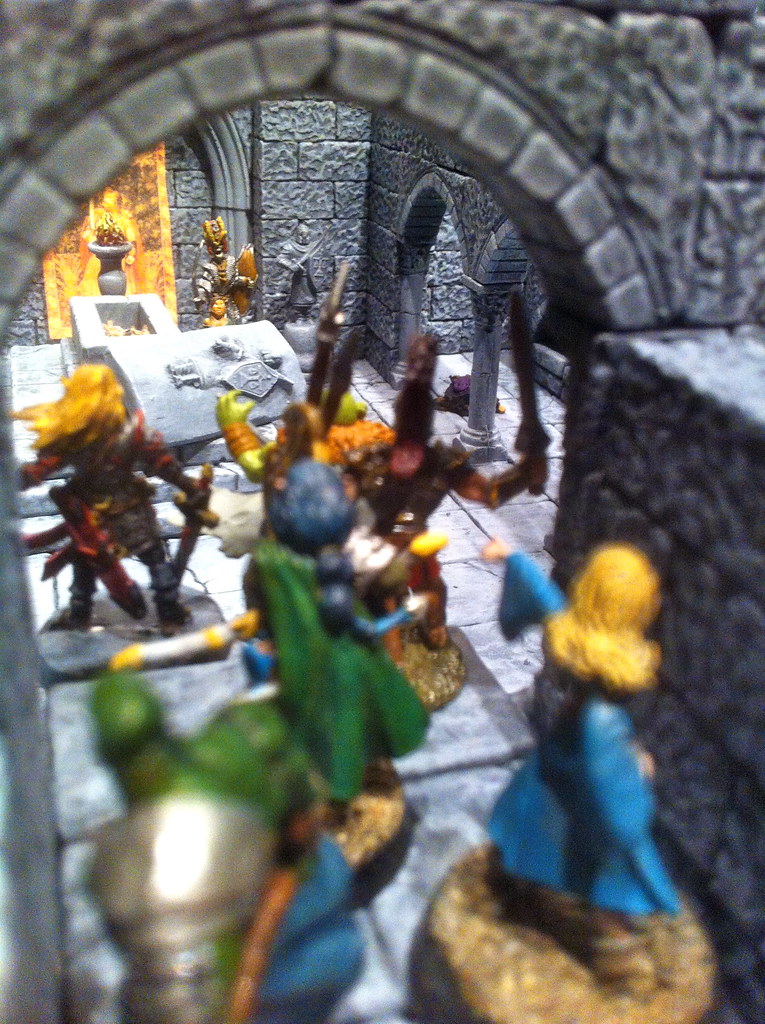
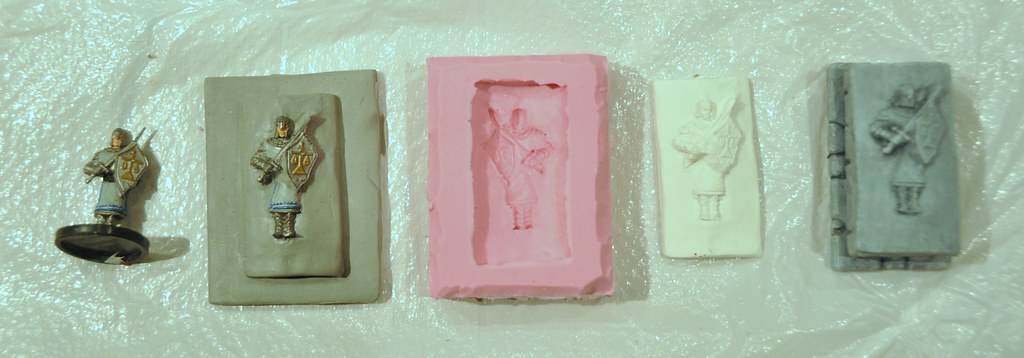
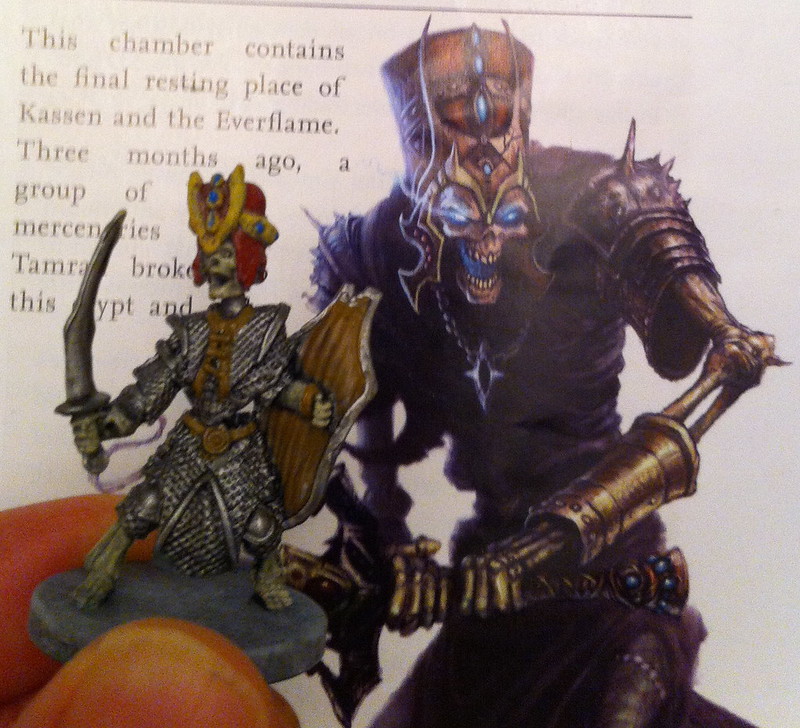
sculpt and create a mold of my own for the sarcophagus lid and statue bases, as well as do some minor miniatures sculpting to give Asar his silly hat. (Just when do warriors that become Skeletal Champions get issued that stupid hat ... I would be all pissy and kill everyone too if I had to wear that abomination.) I used the hatless D&D: Lord of Madness - Skeleton as the base for Asar.  I see of course that paizo is doing an actual skeletal champion in it's Shattered Star release of miniatures.

In a later blog I will detail the build process and the gaming session, as well as what I did to extend the encounter to make the umpteen dozen hours of building somewhat more worth it!  With that in mind, I've also devised a reason for them to come back here to use this again.

In any case I strongly recommend trying this out for yourself.  It's rewarding, fun, makes for great play, and is not really that expensive or difficult to do.


Sunday, January 6, 2013

Good Use for Chessex Dice Containers

So here is a good use for Chessex (and other) dice containers ... miniatures gift boxes! We were trying to go a little cheaper this Christmas so one of the things I gave my kids and wife were custom painted figures by me.  In trying to find a way to nicely display the figures I stumbled across some Chessex dice containers (of which we have many).  I used a 4x1 square lego puttied into the black base.  I used the same reuseable and non-permanent poster putty to hold the figure onto the lego.  I put blue decorative tissue paper around the base and sealed them up.  They stay in place even when the packages were wrapped and banged around a little.
Flickr Photo Set
While I'm on the topic I will present some of my recent paints. It's been years, perhaps 25 years, since I painted mini's. Back in my day I basically did it all through trial and error. No YouTube tutorials, I didn't talk at the stores (American Eagles in Seattle) about technique, and the couple other people that were also painting did not venture out of the circle we were all a part of. So, when my kids encouraged the re-introduction of D&D, and we evolved beyond Lego figures I started painting again ... and now I have YouTube. YouTube can teach you anything. Here is a Flikr Photo Set - "Figures", with some of my recent paints. I would say that these fall somewhere in quality between "better than your standard pre-painted plastic miniature" and "well below the pro" jobs. I am quite pleased with my current output however, even though as GirlPainting on YouTube would say, they are not a very "high standard".